XState is a library for creating, interpreting, and executing finite state machines and statecharts. It's a really powerful package that can be used to manage state in React Apps.
In this guide, we will build a Finite State Machine from scratch using XState and React
Let's dive in!
Sorry for the interrupt!
If you're interested in learning React in a comprehensive way, I highly recommend this bestseller course: React - The Complete Guide (incl Hooks, React Router, Redux)
It's an affiliate link, so by purchasing, you support the blog at the same time.What is a Finite State Machine?
A finite state machine is a mathematical model of computation that describes the behavior of a system that can be in only one state at any given time. For example, let's say we have a switch button, the state can only be On or Off, it's not possible to have On and Off at the same time and this is a representation of a finite state machine.
I agree that theory alone is always confusing
This is a bit cryptic, but no worries once we start implementing the state machine, it will be much clearer. So, let's create a new React App and add the needed dependencies.
Setting up
To do so, let's run the following command on the terminal to create a fresh React App.
npx create-react-app react-xstate-exampleNext, we have to add the xstate and @xstate/react libraries by running the command below:
yarn add xstate@latest @xstate/reactOnce the installation is done, we can now start building our state machine in the next section.
Building a State Machine
In this guide, we will build a simple theme switcher, so let's start building first the state machine.
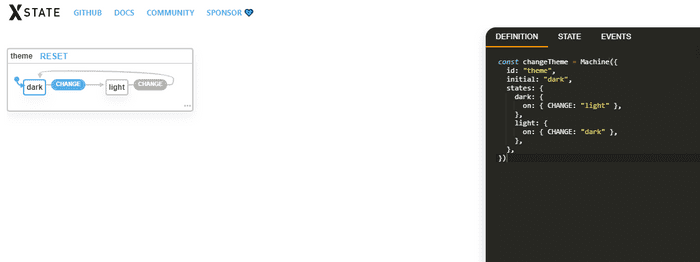
There is a great tool provided by XState, The Xstate Visualizer which allows us to build and visualize the state machine in the browser.

Now, let's take a look of our state machine in App.js
Appjs
import React from "react"
import { Machine } from "xstate"
import "./App.css"

const changeTheme = Machine({
  id: "theme",
  initial: "dark",
  states: {
    dark: {
      on: { CHANGE: "light" },
    },
    light: {
      on: { CHANGE: "dark" },
    },
  },
})
As you can see here, we use the same state machine built with the visualizer. And of course, we need to import Machine from the xstate library to build the state machine otherwise it won't work.
Now, let's break down the object passed as an argument to the Machine() method.
id: it's the identifier or name of the state machineinitial: it's as the name suppose, the initial state of the machine.states: this is where we put our state, here we have two states: dark and lighton: it's used to fires an action. Here, we have an event to change the theme.
A state machine alone doesn't do much, let's use it in the next section.
App.js
import React from "react"
import { Machine } from "xstate"
import { useMachine } from "@xstate/react"
import "./App.css"

const changeTheme = Machine({
  id: "theme",
  initial: "dark",
  states: {
    dark: {
      on: { CHANGE: "light" },
    },
    light: {
      on: { CHANGE: "dark" },
    },
  },
})

function App() {
  const [current, send] = useMachine(changeTheme)

  return (
    <div className="App">
      <h1>{current.matches("dark") ? "Dark Theme" : "Light Theme"}</h1>
      <button onClick={() => send("CHANGE")}>Change Theme</button>
    </div>
  )
}

export default App
Here, we start by importing the useMachine hook which takes as an argument the state machine and returns the current state and a function to update it. If you are familiar with useState hook, it works the same way.
The current state has a bunch of property, but here we just need the matches() method which checks if the current state is equal or not to the argument passed as a parameter and handle it consequently. And now, if the button is clicked, it will change the theme appropriately.
Great! we have done building a Finite State Machines using XState and React.
Thanks for reading!
You can find the Source code here
Photo by Solé Bicycles on Unsplash
