Tailwind CSS is a nice and powerfull utility-first framework that allows crafting websites/apps rapidly. In this guide, we'll be learning how to use a custom background image with dark mode support in Tailwind CSS.
Let's get started!
Sorry for the interrupt!
If you're interested in learning React, or Next.js in a comprehensive way, I highly recommend this bestseller course:
> Next.js & React - The Complete Guide (incl. Two Paths!)
- Setting up a Next.js and Tailwind CSS app
- Configuring Tailwind CSS
- Creating the
PostComponent - Displaying the
PostComponent
Setting up a Next.js and Tailwind CSS app
In this article, I'll use Next.js to start a new app; feel free to use the framework of your choice, just keep in mind what you'll learn here will apply anyway.
Begin by opening your command-line interface (CLI) and running this command:
npx create-next-app next-tailwindcss-appA fresh Next.js app should be created after then. Now, browse to the root of the project and install Tailwind CSS and co (its dependencies).
 yarn add -D tailwindcss postcss autoprefixer
# npm install -D tailwindcss postcss autoprefixer
Next, create your configuration files for Tailwind and PostCSS. For that, you need to execute the following command in your CLI:
npx tailwindcss init -pThis will create two config files: one for Tailwind CSS and another for PostCSS. The purpose of these configurations is to extend the power of Tailwind to match our need.
// tailwind.config.js
module.exports = {
  purge: [],
  darkMode: false, // or 'media' or 'class'
  theme: {
    extend: {},
  },
  variants: {
    extend: {},
  },
  plugins: [],
}
// postcss.config.js
module.exports = {
plugins: {
tailwindcss: {},
autoprefixer: {},
},
}We've now completed the initial setup.
However, we didn't tell yet Next.js that we'll be using Tailwind CSS to style our app. To do so, we have to import Tailwind in our _app.js file.
// pages/_app.jsimport "tailwindcss/tailwind.css"
function MyApp({ Component, pageProps }) {
  return <Component {...pageProps} />
}

export default MyApp
With that step, we can now use Tailwind to style our app.
As you can see, we've gone through several configurations to get our Next.js and Tailwind app up and running. But, luckily there is a quicker way to get all of this with just one command.
Mind blowing :)
npm create next-app --example with-tailwindcss next-tailwindcss-appThis command will use the official Next.js examples to create a new app with Tailwind CSS ready to use.
With that in place, we can now update the Tailwind config file to enable dark mode and add our custom images as well.
Configuring Tailwind CSS
Tailwind CSS makes everything easier. All we have to do to enable dark mode is to add class (or media) as value to the darkMode property.
// tailwind.config.js
module.exports = {
  purge: [],
  darkMode: "class",  theme: {
    extend: {      backgroundImage: {        "nature-light": "url('/nature-light.jpg')",        "nature-dark": "url('/nature-dark.jpg')",      },
    },
  },
  variants: {
    extend: {      backgroundImage: ["dark"],
    },
  },
  plugins: [],
}
As for the background images, we inform Tailwind to use nature-light in light theme and switch to nature-dark in dark mode.
By default, only responsive variants are generated for background image utilities. We need to add dark to the backgroundImage variant to support dark mode.
Oops! I almost forget to mention that we need to add the images into the public folder in order to use the assets (as you might guess) in our app.
You can download the images here:
Let's move on and create our components in the next section.
Creating the Post Component
// components/Post.js
import { useState } from "react"
const LIGHT_THEME = "light"
const DARK_THEME = "dark"
export default function Post() {
const [theme, setTheme] = useState(LIGHT_THEME)
const switchTheme = () => {
if (!document.documentElement.classList.contains(DARK_THEME)) {
document.documentElement.classList.add(DARK_THEME)
setTheme(DARK_THEME)
} else {
document.documentElement.classList.remove(DARK_THEME)
setTheme(LIGHT_THEME)
}
}
return (
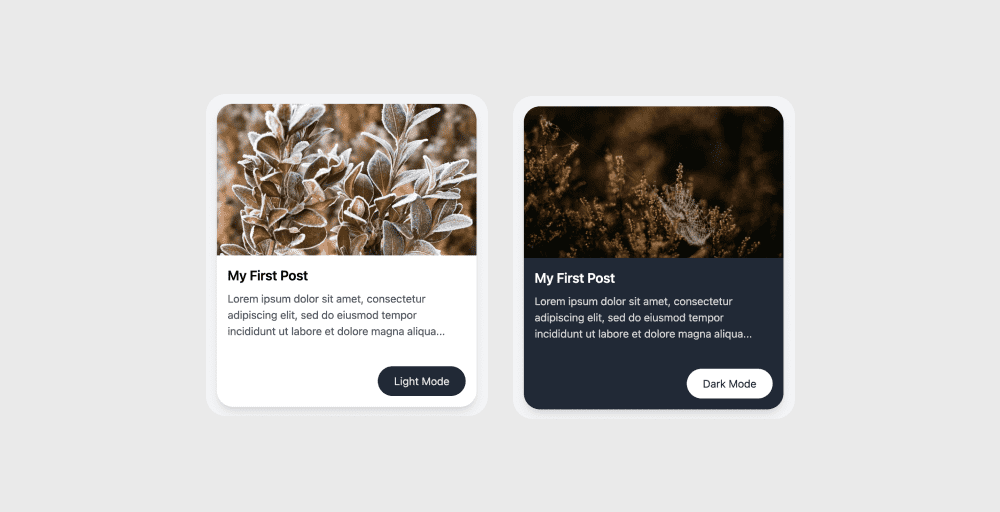
<div className="bg-white dark:bg-gray-800 w-96 pb-4 rounded-3xl shadow-lg overflow-hidden">
<div className="bg-nature-light dark:bg-nature-dark bg-cover object-cover bg-center h-56 w-full" />
<div className="p-4 text-left">
<h3 className="text-xl text-black dark:text-white font-semibold">
My First Post
</h3>
<p className="mt-2 mb-10 text-gray-600 dark:text-gray-300">
Lorem ipsum dolor sit amet, consectetur adipiscing elit, sed do
eiusmod tempor incididunt ut labore et dolore magna aliqua...
</p>
<button
onClick={switchTheme}
className="float-right px-6 py-2.5 bg-gray-800 dark:bg-white text-gray-200 dark:text-gray-800 rounded-full capitalize"
>
{theme} Mode
</button>
</div>
</div>
)
}Here, we have a simple React component with two main things to underline:
- The function
switchThemeallows us to change the theme. Note that here, nothing is persisted to the local storage or context API because it's not the purpose of this tutorial; feel free to push things to the next level and add those features. - The
darkprefix is used by Tailwind to switch between light and dark theme. All classes prefixed bydark:will be used only in dark mode. The background image for light theme will bebg-nature-lightand the one for dark mode will bebg-nature-dark.
Sounds magical? Well, it is, because Tailwind handles almost everything for us.
With this in place, we can progress to the final step and import this component into the index.js file.
Displaying the Post Component
// pages/index.js
import Post from "../components/Post"

export default function Home() {
  return (
    <main className="flex flex-col items-center justify-center w-full min-h-screen py-2 flex-1 px-20 text-center bg-gray-100">
      <Post />
    </main>
  )
}
We're now ready to test our Next.js app in the browser.
To do so, execute the following in the project root:
hopefully it works :)
 yarn dev
 # npm run dev
Let's visit the browser http://localhost:3000
And that's it! Our app is looking tight!
You can find the finished project on this Github repo.
Thanks for reading!